Simple Credit Note Creation
The simplest way to generate a credit note within Truckcom is to create a new job with a negative price. When this is invoiced to your customer a credit note will be generated instead of a standard invoice. The accounts transaction file will then include a record of this ready for you to import into your accounts system of choice.
Advanced Credit Note Creation
Whilst providing the functionality to send credit notes the simple method does result in there being additional jobs in your system that will affect the job counts and reports you may wish to run. In order to alleviate this we also provide an advanced credit note creation method.
Enabling this feature
- Enable this on your system by navigating to the Advanced Admin Settings screen. The admin settings option can be found by hovering over your username – note you will need to be an admin user in the system to enable this.
- Locate the setting called Credit Note Functionality Enabled and change the value to True. This functionality will now be available to all admin users and specific users who you enable this for
Providing Access to Non-Admin Users
- To enable this for other, non admin, users. Navigate to the Office Users tab, this can be found under the Admin Settings screen. Right click and select the User Settings option. Locate and tick the Can Generate Credit Notes setting here.
![]()
Customising the Credit Note Email
By default when you raise the credit note an email will be generated with the PDF credit note attached. The email text will simply state “Credit note attached”.
If you wish you are able to customise this and include specific text in the email you send.
- From the Admin Settings screen select the Email Templates tab
- Add a new item with the name Credit Note. Right click and select Customise Content.
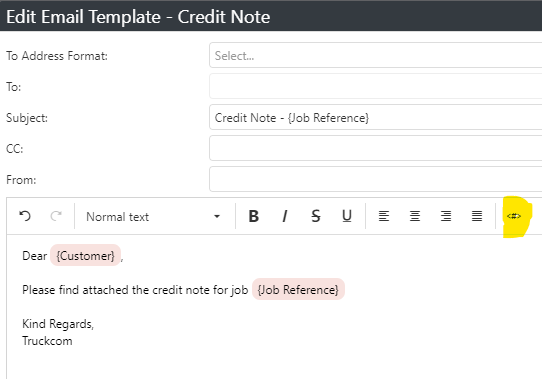
- Fill in the details as required making use of the built in job fields that will then be substituted with the job details when sent.
For example the below shows how you could specify the Subject and email content. The highlighted button allows you to select from a list of all the job fields that can be used.
Please note the To Address Format and To fields will not be used if set here.
Further Feature Customisation
As with all of the features in Truckcom there are many ways that you can customise it to work exactly as you need.
In the case of credit notes, you are able to enter an override email address which will be used instead of the customer invoice email. This could be useful if you want all of these to be sent to your account department initially rather than directly to your customers.
- To set this, again navigate to the Admin Settings screen and locate the setting called Credit Note Email Override. Enter the required email address(es) here.
Generating a Credit Note
Once a job has been invoiced the new credit note functionality will become available, this is a right click option that displays on the jobs screen. If this is not visible in your system use the Customise Menu option to enable it.
- Click on the Generate Credit Note option from the right click menu. You will then see a pop up as shown below.
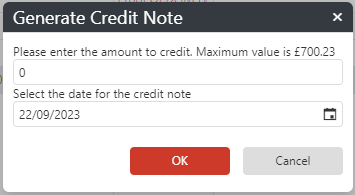
- The key things to note here are:
- You will only be able to enter a positive number up to the amount that was originally invoiced. The maximum amount is displayed on the pop up and a warning will be shown preventing more than this being entered.
- The date shown will default to the current day. If you wish you can change this using the date control. This will then be the date that appears on the credit note.
- Once the form is filled in, click on the OK button. The next pop up shown will be similar to the below. This is the email form with the content previously customised, you will note all of the built in fields have now been replaced with the actual details from the job.
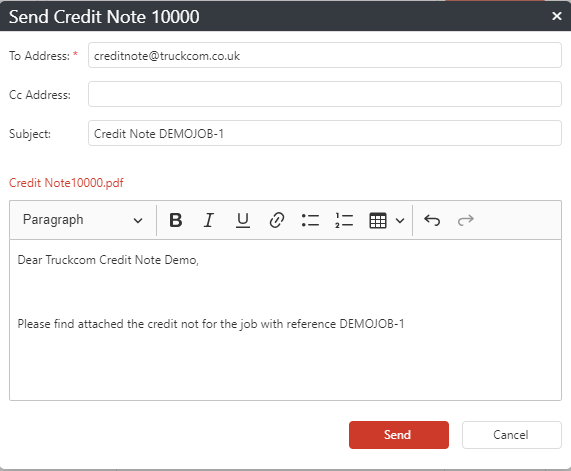
- Key things to note here are:
- The credit note number will increment with each credit note generated. This will start at 10000 but can be adjusted if you require.
- You can open the credit note PDF to review by clicking on the red file link. You should see this matches your existing job invoice format.
- The credit note is not yet recorded in your system until you click the Send button. If you choose not to proceed with generating this then click the Cancel button. You will see a warning to remind you that this has not yet been generated.

- If you are happy with the credit note clicking the Send button will generate and send the email to the address shown on the form. The accounts history file entry will be generated as normal and available to download in the usual location from the Companies tab under the Invoicing sub menu.
- When a credit is raised the job price will be adjusted to reflect the amount credited. This will result in the job price being the actual amount your customer has paid helping to ensure reports are accurate. You will see a record of this in the job history to show the price change and a link to the credit note generated.
Finding Jobs with Credit Notes
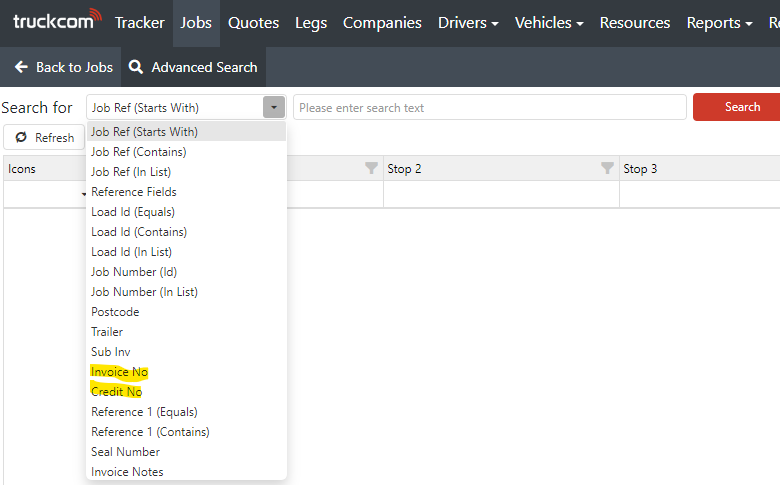
- Once a credit note has been raised you may need to locate the job in order to answer a customer query. You can do this on the Advanced Search screen by searching for either the original invoice number or the credit note number. These options are shown below.
- Additionally a new icon will be shown against the job to indicate it has a credit note raised. This will allow you to use the icon filter column to locate these jobs easily. The new icon will appear as below alongside the other job icons.
![]()


